Feeds:
Posts
Comments

Archive for the ‘baking’ Category

quick and easy chocolate dessert

Mom called it Fudge Crud--but it's delicious and festive enough for any dinner party.

When I was a kid, my mother made an easy, inexpensive dessert that was officially known as Hot Fudge Sundae Cake; Mom called it Fudge Crud. It was one of those science-experiment desserts: you made a cake batter (one without eggs), spread it on the bottom of the pan, then topped it with a mixture of cocoa and brown sugar and poured hot water over the whole thing.

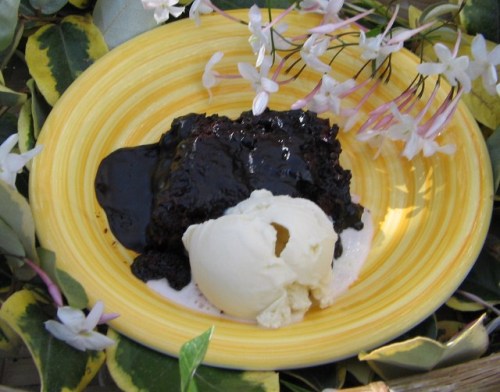
And, miraculously, as the cake baked, the water and cocoa thickened into a sauce and the cake rose to the top, becoming a sort of chocolate floating island in a sea of fudge sauce. It never failed to amaze me–as they say, science works even if you don’t believe in it. There was just one little problem: It wasn’t chocolate-y enough. So this winter, when chilly nights made me think fondly of warm gooey desserts, I remembered Fudge Crud.

And I decided to tinker with the amounts of cocoa until it was chocolate-y enough. When I made the most recent version for friends last week, they declared that I had achieved my goal.

Hot Fudge Sundae Cake

Cake
1 cup flour
3/4 cup granulated sugar
4 tablespoons cocoa (good cocoa – I use Valrhona)
2 teaspoons baking powder
1/2 teaspoon salt
1/2 cup milk or water
2 tablespoons vegetable oil
1 teaspoon vanilla
1 cup chopped walnuts or pecans

Sauce
1 cup packed brown sugar
1/2 cup cocoa
1 3/4 cups hot water

Heat the oven to 350 degrees. Mix together the first five ingredients, then stir in the milk or water, the oil and the vanilla. Stir until smooth, then mix in the nuts. Spread the batter in a baking pan.

Yes. Now, about that baking pan. The original recipe claims that you can make this dessert in a 9x9x2 square pan. And you can–but you will have chocolate goo all over the bottom of your oven if you do. I use a lovely 9x10x3 Le Crueset baking dish I received as a gift a few years ago. It’s perfect. If your friends don’t know you well enough to give you lovely deep baking dishes, try a 9×11 pan.

Anyway, you spread the batter in the pan. Mix together the half-cup of cocoa and the brown sugar and sprinkle it over the batter, then slowly pour the hot water over all. Bake for 40 minutes, until the cake floats to the top and firms up.

Spoon the warm cake into dessert bowls, making sure everybody gets plenty of sauce, then top with ice cream. Yum.

Laurie
Read Full Post »

The holidays may be over, but, as singer/songwriter Robert Earl Keen observed some years ago, the party never ends. And you always need appetizers. Guests drop in, and it’s nice to have something special to serve with a glass of wine. I’m partial to palmiers, especially because I can make them when I have a free half-hour and stick them in the freezer. They’ll keep for a month, well wrapped.

I almost always have a package of puff pastry dough in my freezer (it’s a thin box and only sucks up a very small portion of that precious freezer real estate)

Choose Your Own Filling Palmiers
Roll out one square of the two in the package. If you wet your work surface with a damp sponge and cover with plastic wrap, this job is achieved with very little mess.

Rolling toward the center

I always layer my dough between two pieces of plastic wrap and roll it out so it becomes about two inches longer than it was when I started. Try to roll so the dough becomes more rectangular in shape.

Take off the top piece of plastic wrap and brush the entire flat piece of pastry with olive oil. Now here’s the fun part. Sprinkle with finely grated parmesan cheese and – you choose! I’ve used caramelized onions, olive tapenade, crumbled bacon, my honey’s smoked tomatoes minced fine, minced garlic – the variations are as big as your imagination. The only caveat: use only a couple ingredients.

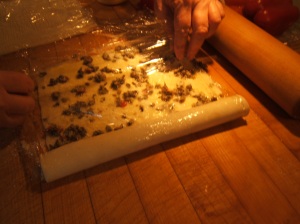
Now, starting at the left edge, start to roll your pastry toward the center. Use your plastic wrap to help in this process. Once you have reached just to the center, do the same on the right side of your pastry. Your pastry should look like two small rolls lying next to each other, and they will be about an inch tall. Wrap it with the same plastic wrap that you just used for your counter covering. Put in the refrigerator for an hour and then stash in the freezer somewhere where it will be able to keep its shape. If it’s cold from the refrigerator, it won’t form ice crystals after it hits your freezer.

When you’re ready, pull the dough out and let thaw for only 10 minutes (make sure to keep it firm) and then slice to about 1/3 inch thick pieces. Lay the slices flat on an ungreased baking sheet about a half-inch apart. If you have time, you can let them rise for about half an hour at room temp. Pop them in a 400 degree oven till golden brown and serve hot. They’re crisp, delicious and easy!

Hazel

Read Full Post »

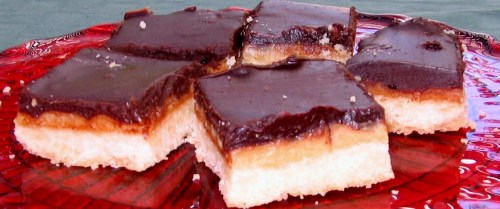
A crunchy crust, a gooey caramel layer and a ganache topping--the perfect toffee bar at last.

By Laurie A. Perry
I’ve been making toffee bars since I was nine years old–but not the same toffee bar. I’ve tried a dozen recipes by that name, and I started numbering the ones I liked enough to make twice. Toffee bar number one had coconut and brown sugar. Toffee bar number two had a brown sugar and butter crust and a topping of melted Hershey’s milk chocolate (milk chocolate–no wonder that one fell by the wayside). Number three, from an ancient Better Homes and Gardens cookie cookbook, calls for a sweetened condensed milk filling and a fudge frosting. I liked it–and Mel really liked it–but it never quite worked.

So I’ve been tinkering with the recipe, and I think the current version is pretty darn good. Try it; see what you think. I’m taking a batch to a New Year’s Day gathering. Because, you know, there just aren’t enough sweets this time of year.

GANACHE-TOPPED TOFFEE BARS

Crust
2 cups flour
1 cup melted butter
1/2 cup sugar
1/2 teaspoon salt
1 teaspoon vanilla

Filling
1 can sweetened condensed milk
2 tablespoons butter
2 teaspoons vanilla

Ganache topping
8 ounces bittersweet chocolate
1 cup cream

Heat the oven to 350 degrees. Line a 9×11-inch baking pan with foil.*
Make the crust: stir together the dry ingredients. Melt the butter; add the vanilla to the butter, and mix both into the dry ingredients. Pat the mixture into the prepared pan; it will be soft and easy to spread out. Bake for about 20 minutes, until lightly browned.
While the crust is baking, make the filling. Pour the sweetened condensed milk into a medium saucepan, add the butter and bring to a simmer. Simmer for about five minutes, stirring to keep it from burning. The mixture will thicken. Add the vanilla.

Pour the filling over the baked crust, making sure to cover all of the crust. Bake for another 20 minutes. It will bubble and turn a lovely golden brown (toffee-colored, in fact).
Remove from the oven and let cool for about half an hour. Make the ganache: break up the bittersweet chocolate and place in a heavy-bottomed saucepan; pour in the cream, and put the pan over low heat. Melt the chocolate, stirring. When the mixture is nice and smooth and glossy, it’s ready to pour gently over the first two layers. Once again, go for coverage–you want the ganache to cover the entire surface.

Chill. Remove the confection from the pan, using the overhanging foil as a handle. Cut into bars. These are rich, so don’t make the pieces too large.

*Maida Heatter’s fool-proof method for lining a pan with aluminum foil: Turn the pan upside down. Tear off a large piece of foil and press it over the pan, so you have the basic shape. Then press the foil into the pan, using a dish towel to keep the foil from tearing.

Read Full Post »

Perfect for Halloween. Or Thanksgiving. Nut-topped pumpkin bars are luscious and so easy to make.


Are you surprised? Once again, we bring you a dessert that will never be recommended by the American Heart Association. But these pumpkin bars are perfect for Halloween parties, and I’m making dozens of them for my sister Allis’s housewarming Halloween bash. (I also made bunches of them for a recent Molly’s Mutts & Meows fundraiser.)

The original version of this bar cookie used a spice cake mix as the base. Just between you and me, I thought it was disgusting. So I replaced it with the world’s easiest bar cookie base, created by Alice Medrich and published in her wonderful book Pure Dessert, as the base for the best lemon bars ever. The topping does have one healthy item in it: pumpkin. The rest of it–cream cheese, sweetened condensed milk, eggs… Well, I suggest when people ask what’s in them, you just mention the pumpkin.

Here’s the recipe.

Cream Cheese Pumpkin Bars

This makes a 9×13-inch panful, and it is made in two stages: first you bake the base, then the filling with the base. Total baking time is about an hour.

The base:
2 sticks of butter
1/2 cup sugar
1 1/2 teaspoons vanilla
1/2 teaspoon salt
2 cups all-purpose flour

The filling:

8 ounces cream cheese, softened
14 oz. can of sweetened condensed milk
16 oz. can pumpkin
2 teaspoons pumpkin pie spice (or 1 teaspoon cinnamon, 1/4 teaspoon cloves, 1/4 teaspoon nutmeg, 1/2 teaspoon ginger)
1/2 teaspoon salt
2 eggs
1 cup chopped walnut or pecans

Heat the oven to 350 degrees. Stir together the sugar, salt and flour. Melt the butter and pour it into the flour mixture; add the vanilla. Stir it together and dump it into the pan and pat it out to the edges. (Notice the elegant simplicity of this approach: no hauling out the food processor and cutting up cold butter and whirring it together with the dry ingredients and then pressing the crumbs into the pan. This is easy.) Bake it for about 25 minutes, until it’s well browned at the edges and golden in the middle.

In the meantime, make the filling. Beat the cream cheese until it’s fluffy, then pour in the milk and beat again. Add the eggs, pumpkin, spices and salt. Mix well. Pour over the baked crust and sprinkle nuts over the top. Bake for 30 to 35 minutes, until set. Cool and then refrigerate.

However, I think these bars are delicious warm, and I dig right in as soon I think they’ve cooled off enough that I won’t burn my mouth too badly.

For parties, I cut the bars about an inch square and put each one in a cupcake paper. There are lots of cute and seasonal cupcake papers around; I’m using black-and-white polka-dot ones for this holiday.

Read Full Post »

These cupcakes are filled with a cream cheese and chocolate chip mixture. They're perfect for picnics: they're sturdy, they pack well and they have no icing to get all over everything. The only challenge? Bringing enough for all your envious seat neighbors at the Hollywood Bowl.

We love the Hollywood Bowl. We look forward to it every summer. Not only do we hear great music under the stars, as the ads say, but we have great picnics under the stars–and the helicopters and airplanes, of course. We like to grab a table on a hillside overlooking Hollywood, with a view of the Capitol Records building, open a bottle of wine and dig into the feast we have packed.

Our first concert–finally!–is Thursday. Needless to say, we’re planning our inaugural picnic supper with some care.
There are certain essentials for the first one. Later we’ll branch out, but here are the items we must have to start:

Champagne
Ripe, homegrown tomatoes
Ryan’s grilled artichokes
Black bottom cups

We’ll be writing about a number of picnic supper items, but in the certain knowledge that life is short, we’re beginning with dessert. This recipe came from Mary McGinnis years ago, and I’ve tinkered with it a bit. It comes under the category of crazy cake, meaning it’s a cake batter made without eggs.

Black Bottom Cups

Filling
16 ounces cream cheese
1 egg
2/3 cup sugar
12 ounces semisweet chocolate chips

Cake
2 1/4 cups flour
1 1/2 cups sugar
1/2 cup cocoa
1 1/2 teaspoon baking soda
1/2 teaspoon salt
1/2 cup butter, melted
1 1/2 cups buttermilk
2 teaspoons vanilla

Heat the oven to 350 degrees and fill 29 muffin cups with cupcake papers.

Beat the cream cheese until it’s soft and smooth, then beat in the egg and sugar. Stir in the chips. Set aside while you make the cake batter.

Combine the dry cake ingredients thoroughly (to distribute the baking soda throughout). Pour in the vanilla, melted butter and buttermilk. Stir until smooth.

Spoon the cake batter into the cupcake cups, filling each one about half full. Add a heaping spoonful of filling to each cup, dividing the filling among the 29 cupcakes.

Bake for about 30 minutes, until the filling is barely tinted brown.

Laurie

Read Full Post »

Snickerdoodles

Crunchy, a little chewy, and truly old-fashioned, snickerdoodles may be the perfect cookie for any picnic.

I love snickerdoodles, but they have always kind of baffled me. They are traditionally leavened with baking soda and cream of tartar. Cream of tartar is the kind of ingredient that most kitchens just don’t stock these days. I know of only two uses for it off-hand–to stabilize egg whites for meringue and for snickerdoodles.

Pretty much every snickerdoodle recipe I’ve encountered calls for a ratio of one part baking soda to two parts cream of tartar. That is essentially the recipe for single-acting baking powder–and yet baking powder doesn’t yield the classic snickerdoodle flavor. Apparently there’s just something about cream of tartar…. The King Arthur Flour site has an intriguing disquisition on leavening–hartshorn? really? I thought hartshorn was strictly for fainting ladies in Victorian novels–that discusses cream of tartar at some length.

You’ll find lots of variations–I’ve seen people boast of adding chocolate chips and dried apricots and coconut to snickerdoodle dough–but I think the point of a cookie like this is its very simplicity. So you won’t find any extras here, and you won’t find baking powder either. I’m not saying a snickerdoodle made with baking powder isn’t good–it is–but it’s a sugar cookie, not a snickerdoodle. Go figure.

Classic Snickerdoodles

1 cup butter
1 1/2 cup sugar
2 eggs
1 teaspoon vanilla
2 3/4 cup flour
2 teaspoons cream of tartar
1 teaspoon baking soda
1/2 teaspoon salt

For Rolling:
2 tablespoons sugar
2 teaspoons cinnamon

Heat the oven to 400 degrees.

Cream together the butter, sugar and eggs. Sift the dry ingredients. (Modern flour doesn’t require sifting, but it’s important to distribute the baking soda throughout the batter, and sifting is an easy way to do that.) Stir the dry ingredients into the butter-egg mixture.

If the dough is too gooey to handle, chill it for about half an hour. I generally do not chill my dough, which might be why my cookies turn out different from Hazel’s, even though we use the same recipe. I wet my hands and roll dough into one-inch balls. Dip each one into the cinnamon sugar and place on an ungreased cookie sheet (I love my Silpats and always use them) about two inches apart. Bake for eight to ten minutes, until they are barely brown. They will puff up and then flatten out, leaving the tops crinkled. This recipe makes about five dozen cookies, just the right amount for a party, but you can halve the recipe–useful tip: half of 3/4 cup is six tablespoons.

You know my usual advice: Eat them hot out of the oven.

Laurie

Read Full Post »

I amplify the chocolate power of my brownies with chocolate chips.


I believe brownies were the very first cookie I ever made. I was nine. And, because of my lunatic father’s devotion to the wilds of Idaho, we were living in the Clearwater Mountains and cooking on a wood-burning stove. So you can see why I truly do not understand why anyone would make brownies from a mix. I mean, if a nine-year-old can make brownies from scratch and bake them in the oven of a wood-burning stove, anyone–absolutely anyone–can make brownies.

There are zillions of recipes for brownies. There are entire books devoted to variations, and I’ve tried a lot of them. This is my version. It’s easy enough for any nine-year-old to tackle, and the results are always delicious.

Laurie’s Brownies

2/3 cup vegetable oil
3/4 cup good cacao (I use Callebaut)
2 cups granulated sugar
4 eggs
1 1/2 teaspoon vanilla

1 1/2 cups flour
1 teaspoon baking powder
1/2 teaspoon salt
1/2 cups chocolate chips
1 cup chopped walnuts or pecans

Heat the oven to 350 degrees (and take the time to appreciate the fact that you don’t have to chop the damned wood for it!). Grease a 9×11-inch baking pan.
Mix the cacao, vegetable oil, sugar, eggs and vanilla together. The batter should be smooth. Stir in the flour, baking powder and salt by hand. Don’t use a mixer; it will add too much air to the batter. Stir in the nuts and chocolate chips. Pour into the prepared pan and smooth the batter to fill the pan.
Bake for 22 to 25 minutes. Check at 22 minutes; brownies should always be slightly underbaked. You want crumbs to stick to the knife but you don’t the batter to still be liquid.

You can let the brownies cool before you cut them into bars, or you can just start digging them out with a spoon and eating them hot. I like them with vanilla ice cream melting over them.

Laurie

Read Full Post »