Feeds:
Posts
Comments

Archive for the ‘Afternoon tea’ Category

The holidays may be over, but, as singer/songwriter Robert Earl Keen observed some years ago, the party never ends. And you always need appetizers. Guests drop in, and it’s nice to have something special to serve with a glass of wine. I’m partial to palmiers, especially because I can make them when I have a free half-hour and stick them in the freezer. They’ll keep for a month, well wrapped.

I almost always have a package of puff pastry dough in my freezer (it’s a thin box and only sucks up a very small portion of that precious freezer real estate)

Choose Your Own Filling Palmiers
Roll out one square of the two in the package. If you wet your work surface with a damp sponge and cover with plastic wrap, this job is achieved with very little mess.

Rolling toward the center

I always layer my dough between two pieces of plastic wrap and roll it out so it becomes about two inches longer than it was when I started. Try to roll so the dough becomes more rectangular in shape.

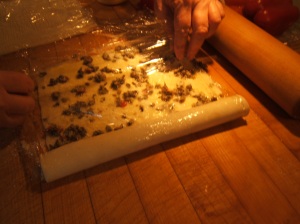
Take off the top piece of plastic wrap and brush the entire flat piece of pastry with olive oil. Now here’s the fun part. Sprinkle with finely grated parmesan cheese and – you choose! I’ve used caramelized onions, olive tapenade, crumbled bacon, my honey’s smoked tomatoes minced fine, minced garlic – the variations are as big as your imagination. The only caveat: use only a couple ingredients.

Now, starting at the left edge, start to roll your pastry toward the center. Use your plastic wrap to help in this process. Once you have reached just to the center, do the same on the right side of your pastry. Your pastry should look like two small rolls lying next to each other, and they will be about an inch tall. Wrap it with the same plastic wrap that you just used for your counter covering. Put in the refrigerator for an hour and then stash in the freezer somewhere where it will be able to keep its shape. If it’s cold from the refrigerator, it won’t form ice crystals after it hits your freezer.

When you’re ready, pull the dough out and let thaw for only 10 minutes (make sure to keep it firm) and then slice to about 1/3 inch thick pieces. Lay the slices flat on an ungreased baking sheet about a half-inch apart. If you have time, you can let them rise for about half an hour at room temp. Pop them in a 400 degree oven till golden brown and serve hot. They’re crisp, delicious and easy!

Hazel

Read Full Post »

Hazel and I both got pretty excited about baking in cans. It’s an old, old technique–as the stuff Mom always called Boston brown bread attests. That bread is not even baked, it’s steamed, which means it’s older than enclosed ovens.

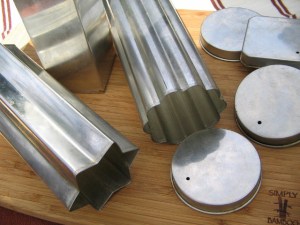
Then Chris Valada offered me the loan of a baking accoutrement I’d never seen: adorable aluminum baking cans/molds. How could I resist? One square, one sort of star-shaped, one scalloped. Oh, boy! I made an orange bread in two of them. Given my experience with one-pound cans, I filled one of them two-thirds and other only half full. Well, two-thirds was still too full, so

These baking cans let us make tea sandwiches in delightful shapes.

there was a certain amount of waste. Not too mention goo on the bottom of the oven.

But the sandwiches we made were yummy! We sliced the bread thin and topped it with whipped cream cheese and slices of radish. The result was unusual and refreshing–and they disappeared within minutes.

The bread recipe, based on one from Joy of Cooking:

3 cups flour
1 tablespoon baking powder
1/2 teaspoon salt
1/2 cup sugar
1 tablespoon orange zest

1 cup milk
1/2 cup orange juice
1 egg
2 tablespoons melted butter

Heat the oven to 350 degrees. Grease the pans or cans (two 8×4-inch loaf pans or four one-pound cans). Whisk together the dry ingredients in a large bowl, then whisk in the zest to distribute it evenly. Beat the wet ingredients and pour them into the dry ingredients. Stir them together quickly (this a quick bread, after all), just until the batter comes together. Scrape the batter into the pans or cans (don’t fill those cans much more than half full to avoid oven clean-up). Bake for about 50 minutes. Cool, then unmold.

Read Full Post »

The Huntington's tea room stands amid hundreds of roses, all in bloom at this time of year.

By Mel

I read Alice in Wonderland for the first time when I was in the fourth grade, but before I met Laurie, I had attended only one tea party, Dangerous Vision’s mad tribute to Lewis Carroll’s birthday. We did drink tea at our house when I was a kid, but only when we were sick; inevitably it was Lipton that my mother fortified with honey and lemon.

(On one memorable occasion I awoke in the middle of the night with asthma, a first for me, and I was terrified. I got both my parents up, and for what seemed like hours we all sat in the kitchen drinking tea and looking for the jokes in Mom’s women’s magazines while I wheezed like an old engine. I suppose it was sort of a tea party. I felt closer to my parents that night than at almost any other time in my life.)

Of course I’d seen movies and TV shows in which old ladies in pastel summer dresses and big-brimmed hats sometimes drank tea while they sat around gossiping about people who weren’t there. It didn’t seem like the sort of thing a real guy would do voluntarily.

But Laurie’s idea of tea was what I learned the Brits called afternoon tea, which was less an opportunity to drink cups of tea with your pinky raised than it is a chance to fill up on little sandwiches. As far as I am concerned, the tea is just an excuse.

Since being introduced to the classic British tea party, I have experienced it at many tea rooms, restaurants, and hotels. Most of them offer a variety of teas served along with a limited number of savory sandwiches and sweet pastries in a silver tray with three or four levels. But my favorite tea is the one at the Huntington Library — a place that includes acres of grass, trees, and flowers, as well as art galleries and the library itself.

The Huntington grounds include a small, charming building they call the tea room. One needs to make a reservation some weeks in advance, but it is worth the trouble. For, in addition to the tea — which is, after all, just tea — there is a large buffet that contains not only the standard sandwiches like cucumber and egg salad but many I’ve never seen before. The carrot and ginger sandwiches, which sound kind of unlikely, hooked me immediately.

I also have a weakness for the little cream-filled éclairs and the brownies. Even though I have eaten very good versions of both at home, eating them at the Huntington gives them a special aura. One might expect the Mad Hatter or the March Hare to show up at any moment.

The important part of all this is that you can return to the buffet as many times as you want to. One dare not be on a diet. This tea is no place for self-control.

Next Saturday Hazel is throwing her yearly Wisteria Tea. I won’t be going, mainly because it is a ladies only event. But I hope and expect that Laurie will bring home leftovers. I don’t have to attend a tea in order to appreciate those little sandwiches.

Read Full Post »

Want perfect round tea sandwiches without crusts or waste? Bake the bread in a can.

Hazel hosts her Wisteria Tea every spring, celebrating the spectacular wisteria vine that swathes her pergola in fragrant lavender blossoms. This event is coming right up, and we’re thinking about our menu. I’ve been poring over my older cookbooks, and I found this comment in the 1975 Joy of Cooking, on the subject of tea breads: “Nut and fruit breads are attractive baked in six-oz. metal juice cans so that they slice prettily for tea.”

I filled this can too full, so it was messy--but good!

This set us off on an exploration of baking breads in cans. Not juice cans. I can see the charm in tiny rounds of bread but I can’t imagine what I’d do with the contents of the innumerable six-ounce cans I’d need. (Can you tell I don’t drink bloody Marys?)

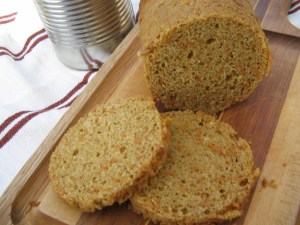
I started with what used to be known as one-pound cans (now generally 14.5 ounces) and a recipe from the 1972 Farm Journal’s Country Cookbook for carrot bread. I discovered two things: Filling a can three-fourths full so it can rise, per the directions in Joy of Cooking, does not give the batter room enough. (Maybe it works with six-ounce cans?) I opened the oven just in time to see the batter rise over the top and slide slowly down the side and plop onto the bottom of the oven. Discovery number two: The resulting bread is a bit too sweet for sandwiches. Delicious, yes, and the crumb is lovely and delicate, but a cup of brown sugar is too much for my taste.

Version number two: I reduced the amount of sugar and filled the cans a little less than two-thirds. Oh, and this time I remembered to add the nuts.

Here’s the recipe, as modified. I think it’s going to be great with egg salad and watercress, but I plan to experiment with sandwich toppings also.

Carrot Sandwich Bread
1 cup finely grated carrots
2/3 cup brown sugar
1 teaspoon baking soda
1 tablespoon vegetable oil
1 cup boiling water
2 eggs
½ teaspoon salt
1 ½ cups unbleached white flour
1 cup whole wheat flour
1 cup chopped pecans

Combine the carrots, sugar, vegetable oil and soda in a large bowl; boil the boiling water over all and stir to mix. Let cool.
Beat the eggs with a fork and add to the cooled carrot mixture. Combine the dry ingredients and stir in quickly, just until the batter comes together. Mix in the pecans. Pour into the greased cans—leaving about one third of the can for head room–and let stand for a few minutes.
Bake at 350 degrees for about 50 minutes. Cool thoroughly before attempting to remove from the cans. I found that it came right out when I left enough room for the bread to rise. It’s easier to slice if you chill in the fridge overnight.

–Laurie

Read Full Post »

This is the week of my birthday. How will I be celebrating it? Well, I’ll be putting in overtime at work (but my sweetie is taking me out to dinner). So, knowing how little time I’m going to have, I wanted to give you guys a couple of recipes in one post–elements for the gingerbread trifle.

First the great gingerbread. It received rave reviews from our guests at the tree-trimming tea. I think it worked equally well with both the butterscotch and the lemon filling. I used Laurie’s lemon curd recipe and thought the combo was fabulous.

The recipe is based on one from Gourmet.
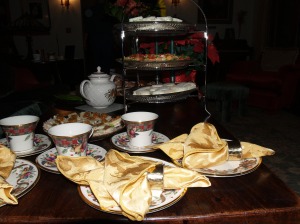
The gingerbread was great but, truly, not pretty enough to photograph after the lava flow!


Gingerbread
2 1/4 cups all-purpose flour
1 teaspoon baking soda
1 teaspoon ground ginger
1 teaspoon ground cinnamon
1/2 teaspoon nutmeg
1/2 teaspoon cardomom
1/4 teaspoon ground allspice
1/2 teaspoon salt
1 stick (1/2 cup) unsalted butter, well softened
2/3 cup molasses (not blackstrap)
2/3 cup packed dark brown sugar
2 large eggs
2 tablespoons finely grated (with a microplane) peeled fresh ginger
2/3 cup hot water

Put oven rack in the middle position and preheat oven to 350° F. Butter a 9-inch square baking pan.
Whisk together flour, baking soda, spices, and salt in a bowl.
Beat together butter, molasses, brown sugar, eggs, and ginger in a large bowl with an electric mixer at medium speed until combined. Reduce speed to low and beat in flour mixture until smooth, then add hot water and mix until combined (batter may appear curdled).
Pour batter into pan and bake until a wooden pick or skewer inserted in center of cake comes out clean, 35 to 40 minutes. Cool to warm in pan on a rack.

And here’s what I learned with this recipe. They were serious when they said “9-inch square baking pan.” I chose a slightly smaller pan, a silly inch smaller, who’d notice? Hmmm, my oven did. As the gingerbread oozed over the side of the pan, landed–and then burned–on the bottom of my oven, the stench of burning gingerbread permeated my house and my nostrils. The smell lasted for hours. Seriously I woke up the next morning with the house still smelling of burnt gingerbread. It was right there with the time I thought it would be a good idea to smoke a cigar in the house with my friend Sam. DON’T DO IT!!!

Tangy, sweet and lemony--made with lemons just picked from the garden


Lemon Curd
Enough ripe bright-skinned lemons–about three–to yield 1 tablespoon of grated zest and 1/2 cup strained juice
1/2 cup plus 2 tablespoons butter, cut up
4 egg yolks
1 whole egg
pinch of salt
1 1/4 cups sugar

Run 2 inches of water into the base pan of a double boiler and set it over medium heat to come to a brisk simmer.
Grate the zest, and juice the lemons.
Put the zest, juice, salt and cut-up butter in the top of the double boiler (off the water).
Beat the egg yolks and whole egg together at speed in a large bowl until they’re foamy; gradually add the sugar and beat until the mixture is pale yellow and very thick (the original says about five minutes –I find it never takes that long, more like three).
Scrape the egg mixture into the double boiler and set the top into the base over the simmering water. Begin whisking the mixture immediately. Cook it, whisking constantly, until it has thickened smoothly and is steaming hot, about 10 minutes. Be careful not to overcook the curd; it is done when it will coat a metal or wooden spoon heavily. (If you have a candy thermometer, it should read between 175 and 200.) Remove the upper pan from the hot water.
Pour the contents into sterilized jars and allow to cool uncovered, then cap the jars with sterilized lids. Or scrape it into a clean plastic container and use it up in a week or two. In any case, keep it the refrigerator.
This recipe comes from the wonderful Fancy Pantry by Helen Witty, unfortunately out of print, though used copies can be found.

Hazel

The butterscotch pudding, which was our alternative filling, could come from a packaged mix–if you can find it. (Don’t use one of those instant puddings; they taste horrible and the texture is disgusting.) But pudding is easy to make from scratch. I used a simple one from Betty Crocker’s Cookbook, but virtually any one will do.

Now, for assembling the trifle, though it’s not exactly a proper trifle because it lacks both alcohol and fruit. (It could have alcohol, of course, maybe a little spiced rum sprinkled over the gingerbread.)

The Trifle
2 cups whipping cream, beaten stiff
Slice the gingerbread and line a pretty glass bowl with the slices (and sprinkle it with a little rum if you like). Spoon the filling of your choice over the gingerbread. Pipe or spoon the whipped cream over it all. If you’re thinking of making it for a holiday party, I recommend getting out the cake decorating set and piping whipped-cream rosettes around the perimeter.

You can assemble this a couple of hours ahead of time, but don’t make it the day before you plan to serve it. The pudding will soak into the gingerbread and you’ll end up with mush.

Laurie

Read Full Post »
Here’s another of those causes I mentioned earlier this week. FixNation is a great organization that fixes feral cats for FREE in the L.A. area. Like the John Tracy Clinic, FixNation is up for a Pepsi Refresh grant. You can vote for both of them (actually you can vote for 10 causes a day). I hope you will!

Now, let’s talk tea. Not the stuff you drink (okay, I’ll be honest–I prefer coffee. With everything except lemon bars), the stuff you eat with tea. Specifically, scones. I love scones and clotted cream–so decadent! Some years ago I had some great scones the Four Seasons in Beverly Hills, which used to do a lovely afternoon tea, especially festive at Christmastime. The wonderful scones (not-wonderful scones are suitable for use as building materials–talk about heavy!) had white chocolate chips and walnuts in them, and I was inspired to try to re-create them. With help from a recipe in Bon Appetit magazine, here’s what I came up with:

Walnut-White Chocolate Scones

2 cups flour
1/4 cup packed brown sugar
1 tablespoon baking powder
1 stick cold unsalted butter
1/2 cup heavy cream
1 egg
3/4 cup white chocolate chips
3/4 cup chopped walnuts

Heat the oven to 400 degrees. I get out the handy-dandy KitchenAid food processor, whirl the flour, salt, sugar and baking powder together and then dump in chunks of butter and process until the whole thing is the texture of coarse meal. You can do this by hand, mixing the dry ingredients in a medium bowl and then rubbing the butter in with your fingertips. Stir together the egg and cream and pour into the butter-flour mixture. Process or stir just until the dough comes together. Mix in the walnuts and white chocolate chips. This is easy if you’ve used a bowl; if you’ve used the food processor, dump the dough on a bread board and gently work the chips and nuts in. Handle as little as possible or the whole thing will toughen up and you’ll get building materials rather than scones.

Hazel picked up a great scone pan at a shop in Cambria, and I envy her that item. If you’ve got one, you just pat the dough into the triangles and bake it. They come out perfectly shaped, beautifully browned, uniform and tidy. If you do what I do–pat the dough into a 3/4-inch-thick round and cut it into triangles–they are not so tidy. But either way, they’re delicious. Bake about 20 minutes, until golden brown.

The really cool thing about these is that you can make the dough ahead of time (and I mean ahead of time, hours earlier if you like), get the scones ready to bake and then stick them in the oven as you sit down to devour those tea sandwiches. Twenty minutes later you’ve got warm, fresh-from-the-oven scones. Yum. Don’t hold back: Lavish them with butter and clotted cream. If consuming butter and cream makes you feel guilty, quote Bob Cratchit to yourself: “Christmas, Mr. Scrooge!”

Laurie

Read Full Post »

Stolen Bites

I have a confession to make: We swiped the recipe below. It’s one of my favorite tea sandwiches, and it was created by my nephew Sam Perry as an appetizer. Sam’s a professional chef, now working at Wilshire in Santa Monica, and he arrived one afternoon several years ago to give me a hand with my annual holiday party. He had this great idea: He wanted to do mini BLTs, using slices of toasted brioche, frisee and lardons.

Let's eat!

Well, I discovered that finding loaves of brioche can be pretty challenging. So I learned to make brioche–talk about dangerous knowledge!–courtesy Nick Malgieri’s How to Bake. Over the years the appetizer has transmogrified a bit. Even though frisee’s not hard to come by, thanks to Kentner or Maggie’s Farm, I often use other greens.

Mini BLTs

1 loaf of brioche
mayonnaise
1 pound of bacon (I use Neiman Ranch’s uncured, which comes in 12-ounce packages, which is plenty)
greens of your choice, shredded (six or seven leaves of romaine, for instance)
3 medium tomatoes, diced

Lay the diced tomatoes on paper towels to dry out a bit. (I used the last of the Carmello tomatoes from my garden–not much to look at but pretty tasty nonetheless.) Cook the bacon: You can actually make lardons (cut the bacon in half-inch slices and fry them, then let them drain); you can bake the bacon slices and crumble them; you can pick up a package of Trader Joe’s already chopped pancetta and cook it according to the package directions. Julienne the greens. All of this can be done ahead of time.

Slice the brioche and toast the slices. (About brioche: Maybe you’ve got a good bakery nearby where you can buy it; I don’t. You could use challah instead, or some other eggy bread with a soft crumb, as a substitute.) Spread the toasted brioche with mayo, top with the shredded lettuce, the bacon and the tomatoes. Quarter each slice and serve.

Try to get some of the mini BLTs out of the kitchen and into your guests’ hands. If you serve this as an appetizer, it will be the first tray to empty. If you make it as one of several tea sandwiches, you will very quickly have the opportunity to admire the pattern of the pretty porcelain plate you served it on.

Laurie

Read Full Post »

Laurie and I have a theory that every good party starts in the kitchen. And in our family, most of them also migrate there during the course of an evening. Laurie has a great kitchen in that it’s open to the living room, with a breakfast bar between the two spaces. She always sets up her appetizers and drinks on the bar, so she can converse with her guests while putting the finishing touches on her meals. Her guests keep her company and usually help out–win-win! The same goes for my sister-in-law Vicki’s fabulous mountain kitchen. Mine’s a bit quirkier, more like a train station, but I like it.

Our Aunt Mary’s kitchen is a different story. It’s probably twice the size of our kitchens, but it still gets pretty crowded. We always try to have appetizers of some sort ready for guests as they arrive, but the day of our tea was drizzly and cool, so we all had champagne in the kitchen while everyone chatted, listened to music and kicked in to help make our afternoon tea.

While our hostess sat with her injured ankle wrapped in ice and propped up on a stool, Maddie assembled the trifle and Allisande made tea. Laurie and I made sandwiches, which was pretty easy, since we’d really done all the prep work in our own kitchens, where we were able to commune with our own food processors and favorite knives. Don’t get me wrong, Mary has all the right stuff–we just can’t find it in her enormous 1920s-era kitchen!

Barb artfully arranged fresh fruit on a crystal dish that she had foraged for in Mary’s butler’s pantry. (She forswears other desserts. Such virtue!) One of the fun things about Mary’s house is that her butler’s pantry is chock-full of antique serving dishes passed on by her and Phil’s moms and aunts. Dee and Ryan arrived late because they had to work late, so they missed out on the fun in the kitchen. But with everyone helping, we pulled together sandwiches for 10 in record-breaking time.

Let’s eat!

Hazel

Read Full Post »